From our friends at College Candy:

Everywhere you look this season there are boyfriend blazers. This simple wardrobe staple can elevate any casual outfit and give it that extra touch of class.
Whether worn over a cute spring dress or paired with skinny jeans, the basic boyfriend blazer is a must-have for every woman’s closet. Now don’t get me wrong, I obviously love me a basic black boyfriend blazer (say that five times fast… I dare you), but it can also look pretty boring and plain.
So if you want to add a little punch or color to your traditional blazer, here is an easy and fun way to update your boyfriend blazer with a patterned cuff.
What You’ll Need:
A boyfriend blazer: Use one you already own or pick one up that’s cheap and chic at Marshalls, Target, or TJ-Maxx. To really get into the season, try a white blazer.
Fabric: Pick any color or pattern that strikes your fancy. You can go bold with something bright and solid; channel Lily Pulitzer with some bright florals; or go for a classic Burberry style with a red, black and beige plaid. Really, the opportunities are endless, so find something that’s you. You’ll need about 3 feet of fabric, so just get a yard (as most craft stores cut by the yard). Joann’s Fabric has a huge and fun selection.
Sewing materials: Needle and thread in black or a color that matches your fabric pattern. A sewing machine if you feel so inclined. A seam ripper if you’ll be recycling an old BF blazer.
What You’ll Do: 1. Make your cuff: using your own blazer as a guide, wrap your fabric around the end of your jacket sleeve so you can see how long your cuff will need to be. (Much like how you would tie a string around your wrist to see where the string needs to be cut so it will fit your wrist properly). With a pen, mark the spot where the fabric meets the fabric.
(Note: you’ll obviously need to do all of these steps twice, unless you only want one cuff!)
2. Now with your fabric on a flat surface, add two inches lengthwise to the spot you marked and mark again.
3. Figure out how wide you want your cuff to be. Double that number and mark your fabric. (So if you want a 4-5 inch cuff, you should cut your fabric 8-10 inches wide.) Now cut out your piece of fabric accordingly. You’ll end up with a big rectangular piece of fabric.
4. Fold your piece of fabric in half, length wise (hot-dog style) with the pattern side showing. The wrong sides of your fabric should be pressed together. Sew the edges of the fabric together starting at the left side. Do not sew the sides together. Now you have one long, folded piece of fabric, which is your cuff!
5. If your blazer has a cuff already, use a seam ripper to undo the previous cuff fabric or lining. If not, fold back the end of your blazer sleeve a few inches.
6. Sew what will be the bottom of your cuff (when the sleeve is rolled up) into the inside of the jacket sleeve. You’ll essentially be sewing in a circle around the sleeve. This will be near the edge of the actual sleeve, which will allow you to expose the cuff without losing any sleeve length.
7. When you’ve finished sewing and the two ends meet, fold back the edges a few centimeters so you can create a nice, even seam and sew them together in the back. (You will not see this when the sleeve is rolled up.)
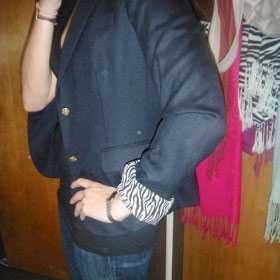
8. Now fold back your cuff on the blazer sleeve. It should look like a finished blazer cuff now. I like the loose cuff look, but if you want a more secure blazer sleeve, sew the top part of the cuff to the actual blazer sleeve..
9. Finally, work that blazer with style and when people ask where your chic new piece is from, proudly tell them you made it!